> For the complete documentation index, see [llms.txt](https://docs.korewireless.com/llms.txt). Markdown versions of documentation pages are available by appending `.md` to page URLs; this page is available as [Markdown](https://docs.korewireless.com/supersim/supersim-first-steps/get-started-with-super-sim-the-raspberry-pi-4-and-the-sixfab-base-hat.md).
# Get Started with Super SIM, the Raspberry Pi 4 and the Sixfab Base Hat
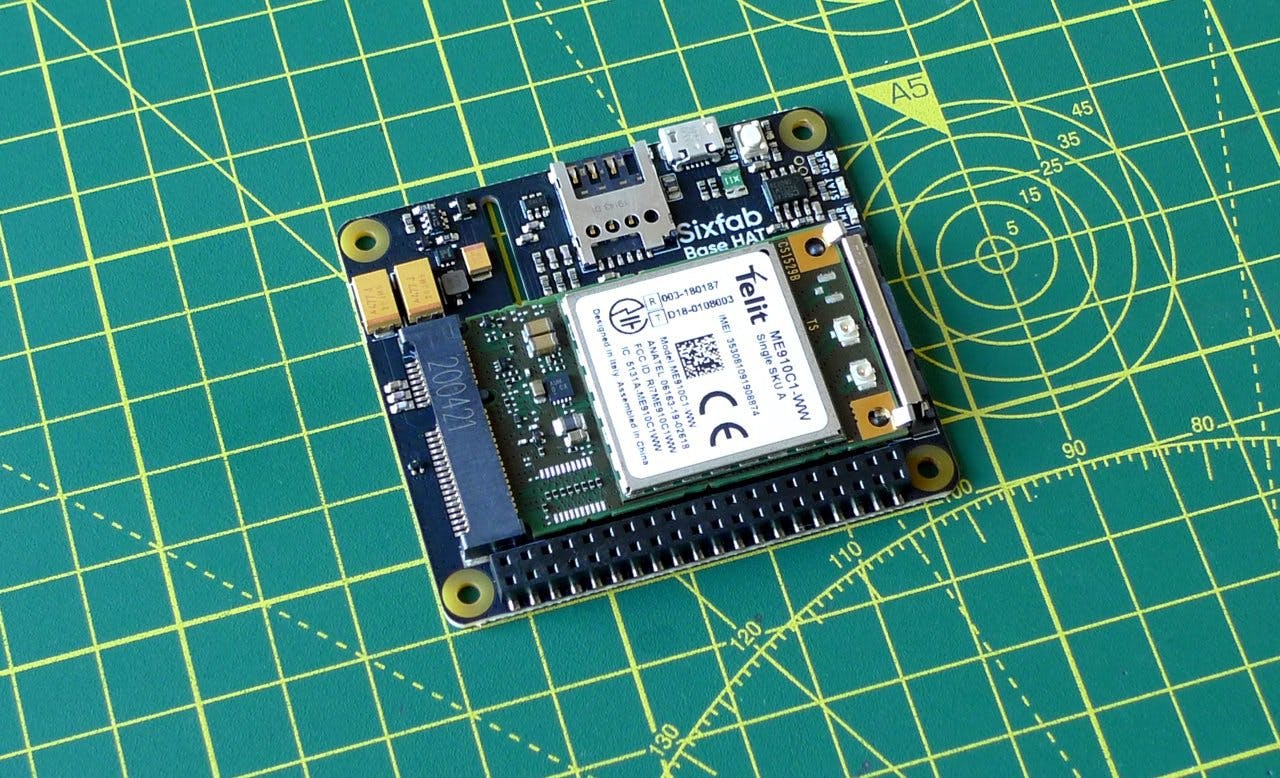
Super SIM can empower a huge range of IoT devices. This guide focuses on just one of them: [Sixfab's 3G-4G/LTE Base Hat](https://sixfab.com/product/raspberry-pi-base-hat-3g-4g-lte-minipcie-cards/), a development board which allows the low-cost Raspberry Pi computer to utilize a variety of cellular modules on Mini-PCIe cards. Among the many modems available is the [Tellit ME910C1-WW](https://www.telit.com/me910c1/). It's the one we'll use in this tutorial. It's a good modem with which to try out Super SIM: it supports the key IoT-oriented cellular standard enabled by Super SIM, Cat-M.
This guide will walk you through connecting the modem card to the Base Hat, and the Base Hat to a Raspberry Pi. It will show you how to install the required software, and get the whole kit and kaboodle online to provide the Raspberry Pi with Internet connectivity.
{% hint style="info" %}
This guide requires a **configured** Super SIM. If you haven't set up your Super SIM in the [Console](https://supersim.korewireless.com/supersim/sims), please do so now. The [Super SIM First Steps guide](https://docs.korewireless.com/en-us/supersim#get-started) has help if you need it.
{% endhint %}
***
## The hardware
In addition to your configured Super SIM, you will need the following hardware to proceed with this guide:
* A Sixfab [Base Hat](https://sixfab.com/product/raspberry-pi-base-hat-3g-4g-lte-minipcie-cards/) . This comes with GPIO extenders and a USB cable.
* A [Tellit ME910C1-WW Mini-PCIe card](https://sixfab.com/product/telit-me910c1-ww-mini-pcie-lte-m-module/) .
* An LTE antenna if your chosen modem doesn't come with one bundled.
* A [Raspberry Pi](https://www.raspberrypi.org/products/raspberry-pi-4-model-b/). This guide was written using the Pi 4 Model B, but there are other versions of the Pi available — it should work with any of them, but we've only tested the 4 and 400. The Base Hat works with the Pis 4, 3, 2, B+, A+, and Zero. To run the Pi, you will also need:
* A Micro SD card of 8GB or above.
* A monitor and an HDMI-to-micro-HDMI cable.
* A keyboard and a mouse
* A 5V, 2A (10W) USB-C AC adaptor.
### Hardware setup: the Raspberry Pi
The Raspberry Pi has its own setup procedure which involves downloading and installing its Linux operating system, called Raspberry Pi OS, onto the Micro SD card. The Raspberry Pi Foundation has [an excellent walkthrough](https://projects.raspberrypi.org/en/projects/raspberry-pi-setting-up) of its own that covers this process — you should use this to get your Pi ready before proceeding to the next stage of this guide.
{% hint style="info" %}
During setup you should connect your Pi 4 to your WiFi network as you will need to download extra software later. We'll disable WiFi in due course to demonstrate data access over cellular.
{% endhint %}
### Hardware setup: the Base Hat
The Base Hat ships with all you need to fit it onto the Pi. Just follow these steps to set everything up:
1. If it's powered up, turn off the Pi.
* If you're at the command line, enter `sudo shutdown -h` now.
* If you're at the desktop, select **Shutdown…** from the **Raspberry** menu and then click **Shutdown** .
* Remove the power cable when the Pi's activity LED has flashed yellow ten times.
2. Fit the modem card into the Base Hat's connector. It will slide in best at an angle:
3. Push the end free end of the card down toward the board until it clicks into place under the two latches:
4. Fit your Super SIM into the Base Hat's SIM slot. The slot takes a 3FF Micro SIM, so take care removing your Super SIM from its mount, or use an adapter if you have removed the Super SIM as a 4FF Nano SIM:
5. Fit either of the two headers supplied with the Hat to the Pi's paired row of GPIO pins and then slot the Base Hat onto the extended header pins:
6. Connect the bundled cellular antenna to the Base Hat. The names of the u.FL connectors are not marked on the Hat, so we've marked it in the image below. Match up the LTE line on the antenna with the u.FL connector in the **middle the board**. This guide doesn't use the GPS antenna but we recommend fitting both antennas to reduce the strain on a single connector:
7. Connect the supplied USB cable to the micro USB port on the Base Hat and a USB port on the Pi:
8. Finally, power up the Pi by re-inserting the power cable.
***
## Software setup
We now need to run through a few steps to get the Pi ready to talk to the Base Hat. Some of these will require you to restart the Pi.
### 1. Set up serial port access
1. At the command line run `sudo raspi-config` .
2. Use the cursor keys to highlight **Interfacing Options**, then hit **Enter**:
3. Now highlight **Serial Port** and hit **Enter**:
4. When you are asked **Would you like a login shell to be accessible over serial?** select **No** and hit **Enter**:
5. When you are asked **Would you like the serial port hardware to be enabled?** select **Yes** and hit **Enter**:
6. Select **Finish** .
7. The `raspi-config` utility will offer to restart the Pi — accept its suggestion.
### 2. Power up the Hat
When the Pi is back up, you should see that the Base Hat's **PWR** Led is lit red:
At the command line or in a desktop Terminal run:
```bash
ls /dev/ttyUSB*
```
You should see a list of items all beginning with `ttyUSB` and including `ttyUSB2`, which is the device you will use in subsequent steps.
If you don't see a list of TTYs, check that the Base Hat's **PWR** LED is lit, and it its USB cable is connected.
### 3. Connect to the Internet
Now we know we have a cellular connection, we can connect to the Internet. We can set up the Pi's required PPP (Point-to-Point Protocol) connection using software. Let's install it now. Run the following at the command line or in a desktop Terminal:
```bash
wget https://raw.githubusercontent.com/sixfab/Sixfab_PPP_Installer/master/ppp_install_standalone.sh
```
The script will take a second or two to download. Now run:
```bash
chmod +x ppp_install_standalone.sh
```
and then:
```bash
sudo ./ppp_install_standalone.sh
```
The script will prompt you for setup information:
* When it asks **Please choose your Sixfab Shield/HAT** , enter `6` for the Base Hat.
* When it asks **What is your carrier APN?** , enter `super` .
* When it asks if you need to enter a username and password, just hit `n` .
* When it asks **What is your device communication PORT?** , enter `ttyUSB2` .
Last of all, the script will also ask **Do you want to activate auto connect/reconnect service at R.Pi boot up?** You can enter `y` (yes) or `n` (no) according to preference. If you select no, you will need to start the PPP connection manually — this is what the remainder of this section of the tutorial assumes you have chosen. However, if you select yes, you can reboot the Pi and jump straight to testing.
When the installation is done you'll see the message **Press ENTER key to reboot** — do so.
After the Pi has rebooted, you're all set to access the Internet over cellular. To be sure it's working, turn off WiFi — this is easiest to do this from the icon in the Desktop menu bar.
To initiate an Internet connection, at the command line or in a desktop terminal run:
```bash
sudo pon
```
You'll see a stack of lines displayed at the command line.
When the prompt is back, you're ready to try out the Internet connection:
* Open up a browser and navigate to **korewireless.com**:
* At the command line or in a desktop terminal, enter `ifconfig` and look for the `ppp0` entry — it should have a valid IP address listed under `inet`:
Well done! You now have a Raspberry Pi computer that's connected to the Internet via Super SIM. You can now start experimenting with cellular Internet connectivity, or begin developing your own IoT application proof-of-concept.
***
## Next steps
Your Raspberry Pi is now able to access the cellular network. Over to you: what are you going to build? We can't wait to find out.
In the meantime, here are some suggestions for things to try:
* Write some code to get data from a cloud service API via cellular. Here's a good selection of [public APIs](https://github.com/public-apis/public-apis) you might like to experiment with.
* [Try out Super SIM's SMS Commands API](https://docs.korewireless.com/en-us/supersim/get-started/get-started-with-super-sim-sms-commands-and-the-raspberry-pi-4) , which you can use to exchange machine-to-machine (M2M) messages between your cloud and your IoT devices.
* Use the [Console](https://supersim.korewireless.com/supersim/sims) or [Super SIM API](https://docs.korewireless.com/en-us/api/products/supersim) to monitor your Super SIM's data usage.
---
# Agent Instructions
This documentation is published with GitBook. GitBook is the documentation platform designed so that both humans and AI agents can read, navigate, and reason over technical content effectively. Learn more at gitbook.com.
## Querying This Documentation
If you need additional information that is not directly available in this page, you can query the documentation dynamically by asking a question.
Perform an HTTP GET request on the current page URL with the `ask` query parameter, and the optional `goal` query parameter:
```
GET https://docs.korewireless.com/supersim/supersim-first-steps/get-started-with-super-sim-the-raspberry-pi-4-and-the-sixfab-base-hat.md?ask=&goal=
```
`ask` is the immediate question: it should be specific, self-contained, and written in natural language.
`goal` is optional and describes the broader end goal you are ultimately trying to accomplish on behalf of the user. GitBook uses it to tailor the answer towards what is most useful for that goal.
The response will contain a direct answer to the question and relevant excerpts and sources from the documentation.
Use this mechanism when the answer is not explicitly present in the current page, you need clarification or additional context, or you want to retrieve related documentation sections.