> For the complete documentation index, see [llms.txt](https://docs.korewireless.com/llms.txt). Markdown versions of documentation pages are available by appending `.md` to page URLs; this page is available as [Markdown](https://docs.korewireless.com/supersim/works-with-super-sim/works-with-super-sim-quectel-eg25-g.md).
# Works with Super SIM: Quectel EG25-G
The Quectel EG25-G module supports LTE Cat 4 (4G), UMTS/HSPA+ (3G), and GSM/EDGE/GPRS (2G) cellular connectivity, and features integrated GNSS. Optimized for broadband IoT applications requiring very high bandwidths. The EG25-G provides data rates of up to 150Mbps down and 50Mbps up.
{% hint style="info" %}
Learn more about the EG25-G on the [Quectel website](https://www.quectel.com/product/lte-eg25-g).
{% endhint %}
## Get started with EG25-G and Super SIM
The best way to begin working with the EG25-G is to take advantage of [Quectel's UMTS & LTE EVB developer kit](https://www.quectel.com/product/umts-lte-evb-kit). It features powerful and easy‐to‐use tools in an environment specifically designed for the development and testing of cellular and GNSS applications based on any of a variety of Quectel modems, including the EG25-G. Just clip on a test board featuring the modem you're using. The one you need for this guide is the EG25-G-TE-A test board. It's available separately. The kit can be connected to and used with a Windows 10, Linux or macOS computer.
The EVB and the separate test board can be purchased from the following suppliers:
### EVB
* [Mouser](https://www.mouser.com/new/quectel/quectel-umts-lte-evb-kit/)
* [Digikey](https://www.digikey.com/en/products/detail/quectel/UMTSLTEEVB-KIT-B/13278231)
### EG25-G-TE-A
* [Mouser](https://www.mouser.com/ProductDetail/Quectel/EG25GGBTEA-256-SGNS?qs=GedFDFLaBXHH1X9gkwHxpg%3D%3D)
{% hint style="info" %}
Working with the EVB and EG25-G requires a configured Super SIM. If you haven't set up your Super SIM in the [Console](https://supersim.korewireless.com/supersim/sims), please do so now. The Super SIM First Steps guide has help if you need it.
{% endhint %}
**1. Connect the EVB to your computer**
1. Slot a Super SIM into the board's SIM holder. It takes a standard mini-sized SIM, or a micro- or nano-SIM first fitted into an adapter:
2. Fit the EG25-G test board to the top of the EVB, clipping it to the two connectors in the middle of the EVB. You can place it correctly by aligning the metal panel on the underside of the test board with the four arrows printed on the EVB:
3. Connect one of the larger bundled antennas to the test board's uFL connector, marked **MAIN**. You will need one of the supplied whip adapters to join board and antenna:
4. Connect the EVB to your computer with the supplied RS232-USB cable. Connect the cable to the EVB's **COM (MAIN)** connector:
5. Connect the EVB to a suitable power source, such as a USB AC adapter, and then turn on the EVB by sliding the **POWER** switch to the position marked **ON** on the board:
6. Press the **PWRKEY** button once to enable the modem test board:
At this point the board's **POWER**, **STATUS**, and **NET\_MODE** LEDs should be lit, and the **NET\_STA** LED should be flashing:
**2. Access the EVB from your computer**
{% tabs %}
{% tab title="Linux" %}
1. Open your distribution's terminal app.
2. Confirm connection with `ls /dev/ttyUSB*` — you should see a single device listed: `/dev/ttyUSB0` . This is the USB-to-serial device you'll use to communicate with the EVB.
3. Using a serial tool like `minicom` — you will have to install this separately from source or a package manager like `apt` — access the board with `minicom -o -D /dev/ttyUSB0` .
{% endtab %}
{% tab title="macOS" %}
1. Open the Terminal app.
2. Confirm connection with `ls /dev/cu*` — you should see one device listed `/dev/cu.usbserial-14140` . This is the USB-to-serial device you'll use to communicate with the EVB.
3. Using a serial tool like `minicom` — you will have to install this separately from source or a package manager like [Homebrew](https://brew.sh/) — access the board with `minicom -o -D /dev/cu.usbserial-14140` .
{% endtab %}
{% tab title="Windows 10" %}
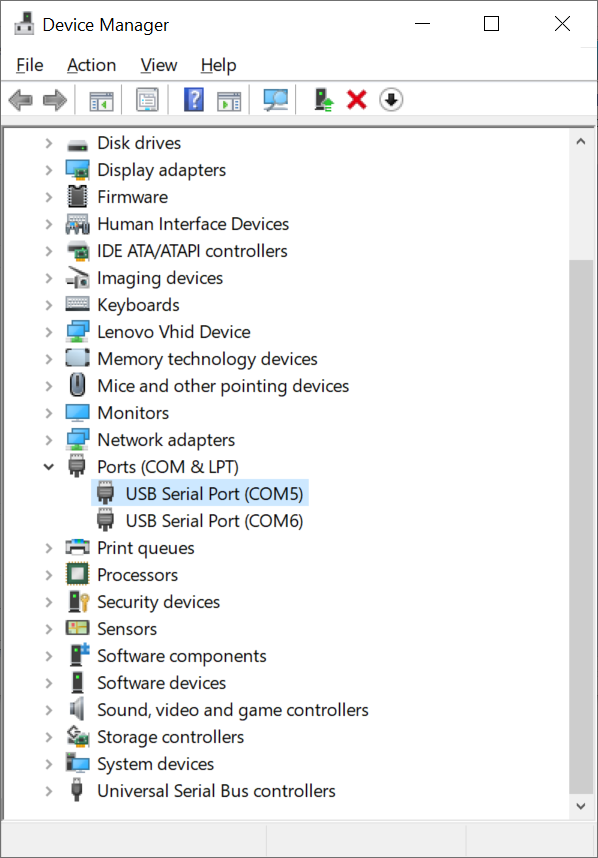
1. Windows 10's Device Manager will show the EVK-R5 as two USB Serial Ports in the **Ports (COM & LPT)** section. Try each one in turn, the lowest number first. Note its port's COM number:
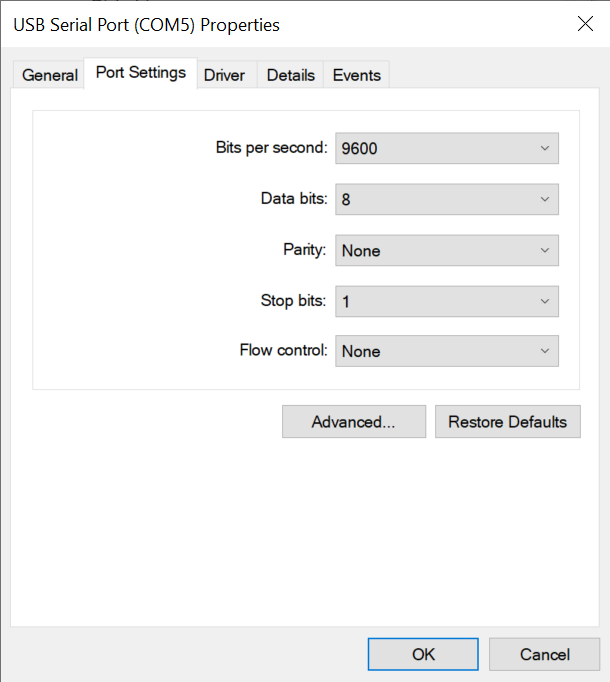
2. Right-click on the Pico's entry in the Device Manager list and select **Properties...** . Select the **Port Settings** tab and note the **Bits per second:** value:
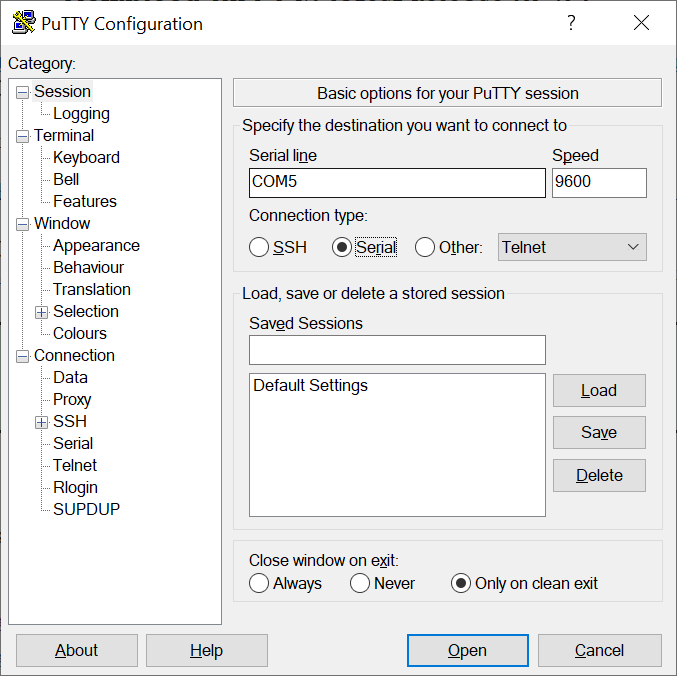
3. [Download and install PuTTY](https://www.chiark.greenend.org.uk/~sgtatham/putty/latest.html) a terminal emulator for Windows.
4. Run PuTTY, select **Serial** under the **Connection type** , and enter the COM number (as, for example, `COM5`) in the **Serial line** field. Make sure the **Speed** field is set to match the **Bits per second:** value you got from Device Manager:
5. Click **Open** .
6. When you see references to Minicom in the remainder of the tutorial, perform the tasks using your open PuTTY window.
{% endtab %}
{% endtabs %}
**3. Check your current carrier**
Within `minicom` or PuTTY, enter the AT command `AT+COPS?` to see which carrier your EG25-G is connected through:
## Useful AT commands
### Initialization
The EG25-G supports LTE Cat-4 FDD in bands 1-5, 7-8, 12-13, 18-20, 25-26, 28, TDD in bands 38-41, and GSM at 850, 900, 1800, and 1900MHz.
If you wish to limit communications to LTE only, i.e., to disable 2G (GSM), issue this command:
{% code lineNumbers="true" %}
```bash
AT+QCFG="nwscanmode",3
```
{% endcode %}
To instruct the modem to initiate data-centric attachments only — ie., not to make voice-oriented circuit-switched attachments too, which is the default — issue:
{% code lineNumbers="true" %}
```bash
AT+QCFG="servicedomain",1
```
{% endcode %}
All these settings will be applied immediately.
### Set the APN
Issue this AT command first to apply the Super SIM Access Point Name (APN):
{% code lineNumbers="true" %}
```bash
AT+CGDCONT=1,"IP","super"
```
{% endcode %}
By default, the EG21-G will roam automatically, but you can force this by issuing:
{% code lineNumbers="true" %}
```bash
AT+QCFG="roamservice",2
```
{% endcode %}
These settings will be applied immediately.
### Establish a data connection
Having set the modem's APN, establish a Packet Data Protocol (PDP) context with the following command:
{% code lineNumbers="true" %}
```bash
AT+QIACT=1
```
{% endcode %}
The single parameter is the PDP context's ID, in the range 1-16. It should match the first parameter in the above `CGDCONT` command.
You can also `QIACT`, in its read form, to get the device's data-connection state — and IP address, if the context is active:
{% code lineNumbers="true" %}
```bash
AT+QIACT?
+QIACT: 1,1,1,"100.74.24.186"
```
{% endcode %}
The first numeric parameter is the context ID. The second is its state — `1` indicates it is active — and the third is its type: `1` for IPV4 or `2` for IPV6.
### Perform a ping
Issue the Quectel-specific command
{% code lineNumbers="true" %}
```bash
AT+QPING=1,""
```
{% endcode %}
to ping a server. Using one of Google's DNS servers as an example, this will yield:
{% code lineNumbers="true" %}
```bash
+QPING: 0,"8.8.8.8",32,167,255
+QPING: 0,"8.8.8.8",32,162,255
+QPING: 0,"8.8.8.8",32,164,255
+QPING: 0,"8.8.8.8",32,162,255
+QPING: 0,4,4,0,162,167,163
```
{% endcode %}
### Perform an HTTP GET
To issue an HTTP `GET` request using the EG25-G's built-in HTTP client, run the following commands:
1. Set the PDP context ID: `AT+QHTTPCFG="contextid",1`
2. Enable output of HTTP response headers: `AT+QHTTPCFG="responseheader",1`
3. Activate the PDP context if it is not already active: `AT+QIACT=1`
4. Set the target URL: `AT+QHTTPURL=21`This sets the modem to receive, prompted by the output `CONNECT`. The first parameter is the number of bytes the modem should expect to receive: it will end input after receiving this number of characters. The value of `21` comes from the URL below. The URL you provide must include the protocol, i.e., `http://`.
5. Upon receiving `CONNECT`, enter the URL. For example: `http://ifconfig.co/ip`
6. Make a `GET` request: `AT+QHTTPGET`
7. View the request: `AT+QHTTPREAD`
The request will look like this:
{% code lineNumbers="true" %}
```bash
HTTP/1.1 200 OK
Date: Fri, 20 May 2022 08:52:56 GMT
Content-Type: text/plain; charset=utf-8
Content-Length: 13
Connection: keep-alive
CF-Cache-Status: DYNAMIC
Report-To: {"endpoints":[{"url":"https:\/\/a.nel.cloudflare.com\/report\/v3?s=9fl%2B3t%2FRMhY2tMyWQDFAIM1mfFem0zLc7aONeXJ%2Fg4a%2FJPKFl%2BeGYElL5zwwuxi7%2BIfqx}
NEL: {"success_fraction":0,"report_to":"cf-nel","max_age":604800}
Server: cloudflare
CF-RAY: 70e3d6ceb8cc5b17-IAD
alt-svc: h3=":443"; ma=86400, h3-29=":443"; ma=86400
44.204.32.40
OK
+QHTTPREAD: 0
```
{% endcode %}
{% hint style="warning" %}
This example uses a service that returns the IP address of the requester.
{% endhint %}
### Custom HTTP request headers
If you need to provide extra HTTP request headers, such `Authorization: Basic `, or a custom header required by your server, issue
{% code lineNumbers="true" %}
```bash
AT+QHTTPCFG="requestheader",1
```
{% endcode %}
to tell the modem to use the custom header that you will provide when you make each request. You will need to create a full HTTP request header separated from your request body by the characters ``. Whether you make a `POST` or a `GET` request, include a byte-count parameter that totals the header plus the body (`POST` request) or header alone (`GET` request). For example, `AT+QHTTPGET=60,512` for a 512-byte header (including the end-of-header ``). The first parameter, `60`, is a timeout. This usually defaults to 60 seconds but must be included if a second parameter is also present.
### Perform an HTTPS GET
To issue a secure HTTP `GET` request using the EG21-G's built-in HTTP client, you follow the same procedure outlined above but with some extra steps included to configure SSL.
1. Set the PDP context ID: `AT+QHTTPCFG="contextid",1`
2. Enable output of HTTP response headers: `AT+QHTTPCFG="responseheader",1`
3. Activate the PDP context if it is not already active: `AT+QIACT=1`
4. Select the SSL context ID for this PDP context ID: `AT+QHTTPCFG="sslctxid",1`
5. Set the SSL version. Choose TLS 1.2: `AT+QSSLCFG="sslversion",1,3`
6. Set the SSL cipher suite. Choose all types: `AT+QSSLCFG="ciphersuite",1,0xFFFF`
7. For testing, set the SSL verification level to 0, so no CA certificate is required: `AT+QSSLCFG="seclevel",0`
8. Set the target URL: `AT+QHTTPURL=70`This sets the modem to receive, prompted by the output CONNECT. The parameter is the number of bytes the modem should expect to receive: it will end input after receiving this number of characters. The value of `70` comes from the URL below. The URL you provide must include the protocol, i.e., `https://`.
9. Upon receiving `CONNECT`, enter the URL. For example: `https://twilio-cms-prod.s3.amazonaws.com/documents/super-sim-test.json`
10. Make a `GET` request: `AT+QHTTPGET`
11. View the response: `AT+QHTTPREAD`
The request will look something like this:
{% code lineNumbers="true" %}
```bash
HTTP/1.1 200 OK
Date: Thu, 19 May 2022 10:23:25 GMT
Last-Modified: Thu, 19 May 2022 10:05:25 GMT
Accept-Ranges: bytes
Content-Type: application/json
Server: AmazonS3
Content-Length: 128
{
"userId": 1,
"id": 5,
"title": "laboriosam mollitia et enim quasi adipisci quia provident illum",
"completed": false }
OK
+QHTTPREAD: 0
```
{% endcode %}
### Perform an HTTP(S) POST
Sending data from the modem to an Internet-hosted API follows the paths outlined above for the HTTP and HTTPS protocols. The key difference is that you call `AT+QHTTPOST` instead of `AT+QHTTPGET`.
Optionally, the `QHTTPOST` command takes a parameter indicating the amount of data you are sending. The modem uses this to read that number of bytes via the UART over which your application is communicating with it — just as it does with the `QHTTPURL` command we used earlier. If you are providing a custom HTTP request header, remember to include its length too.
### Use low-power modes
While the EG21-G supports low-power modes for eDRX and PSM, support for these features will vary by visited network and location. The commands to enable each of these settings on the EG21-G are, respectively:
{% code lineNumbers="true" %}
```bash
AT+CEDRXS=1
AT+CPSMS=1
```
{% endcode %}
Both settings, but especially PSM, can prevent the modem from being accessible through the terminal during its sleep time. It's best to experiment with these features with the modem local. To disable all power saving if needed, send:
{% code lineNumbers="true" %}
```bash
AT+CEDRXS=0
AT+CPSMS=0
```
{% endcode %}
## Reach out for more information
Keen to find out more about how the Quectel EG25-G cellular module can power your IoT product design? [Contact Quectel sales](https://www.quectel.com/contact) to line up a conversation.
And don't forget, [we're always ready to discuss how Super SIM can help you](https://www.korewireless.com/iot/help) too.
## Additional resources
### KORE resources
* [Get Started with Super SIM](/supersim/supersim-first-steps.md)
* [Super SIM global network partners](/supersim/available-networks.md)
* [The Cellular Module Knowledgebase](/supersim/cellular-module-knowledgebase.md)
### Quectel resources
* [EG25-G Data Sheet](https://www.quectel.com/login/?redirect=https%3A%2F%2Fwww.quectel.com%2Fproduct%2Flte-eg25-g%2F) *Quectel login required*
* [EG25-G AT Commands Manual](https://www.quectel.com/login/?redirect=https%3A%2F%2Fwww.quectel.com%2Fproduct%2Flte-eg25-g%2F) *Quectel login required*
* [EG25-G GNSS Application Note](https://forums.quectel.com/uploads/short-url/jujxS4iCyMIMmoYNv61ixKO9Ij9.pdf)
---
# Agent Instructions
This documentation is published with GitBook. GitBook is the documentation platform designed so that both humans and AI agents can read, navigate, and reason over technical content effectively. Learn more at gitbook.com.
## Querying This Documentation
If you need additional information that is not directly available in this page, you can query the documentation dynamically by asking a question.
Perform an HTTP GET request on the current page URL with the `ask` query parameter, and the optional `goal` query parameter:
```
GET https://docs.korewireless.com/supersim/works-with-super-sim/works-with-super-sim-quectel-eg25-g.md?ask=&goal=
```
`ask` is the immediate question: it should be specific, self-contained, and written in natural language.
`goal` is optional and describes the broader end goal you are ultimately trying to accomplish on behalf of the user. GitBook uses it to tailor the answer towards what is most useful for that goal.
The response will contain a direct answer to the question and relevant excerpts and sources from the documentation.
Use this mechanism when the answer is not explicitly present in the current page, you need clarification or additional context, or you want to retrieve related documentation sections.