
Get Started with Super SIM, the Raspberry Pi 4 and the Waveshare 4G Hat
Super SIM can empower a huge range of IoT devices. This guide focuses on just one of them: Waveshare's SIM7600G-H 4G Hat, a development board which equips a low-cost Raspberry Pi computer with a Simcom 7600G-H cellular modem.

The hardware
In addition to your configured Super SIM, you will need the following hardware to proceed with this guide:
A Waveshare SIM7600G-H 4G HAT . This is the global version; there are variants that target specific territories.
A Raspberry Pi. This guide was written using the Pi 4 Model B, but there are other versions of the Pi available — it should work with any of them, but we've only tested the 4. The SIM7600G-H 4G Hat works with all but the very first Pi. To run the Pi, you will also need:
A Micro SD card of 8GB or above.
A monitor and an HDMI-to-micro-HDMI cable.
A keyboard and a mouse
A 5V, 2A (10W) USB-C AC adaptor.
Hardware setup: the Raspberry Pi
The Raspberry Pi has its own setup procedure which involves downloading and installing its Linux operating system, called Raspberry Pi OS, onto the Micro SD card. The Raspberry Pi Foundation has a very good walkthrough of its own that covers this process — you should use this to get your Pi ready before proceeding to the next stage of this guide.

Hardware setup: the SIM7600G-H 4G Hat
The SIM7600G-H 4G Hat ships with all you need to fit it onto the Pi. Just follow these steps to set everything up:
Fit your Super SIM into the SIM7600G-H 4G Hat's SIM retainer. This takes a full-size SIM, so take care removing your Super SIM from its mount, or use an adapter if you have removed the Super SIM as a 4FF Nano SIM:

Lock the SIM retainer in place to keep the Super SIM secure:

If it's powered up, turn off the Pi.
If you're at the command line, enter
sudo shutdown -hnow.If you're at the desktop, select Shutdown… from the Raspberry menu and then click Shutdown .
Remove the power cable when the Pi's activity LED has flashed ten times.
Slot the SIM7600G-H 4G Hat onto the Pi's GPIO header:

Connect the supplied USB cable to the micro USB port marked just USB on the SIM7600G-H 4G Hat and a USB port on the Pi:

Assemble and connect the bundled cellular antenna to the SIM7600G-H 4G Hat. Connect it to the LTE connector marked MAIN on the board:

Here's a close-up:

Finally, power up the Pi by re-inserting the power cable.
Software setup
We now need to run through a few steps to get the Pi ready to talk to the SIM7600G-H 4G Hat. Some of these will require you to restart the Pi.
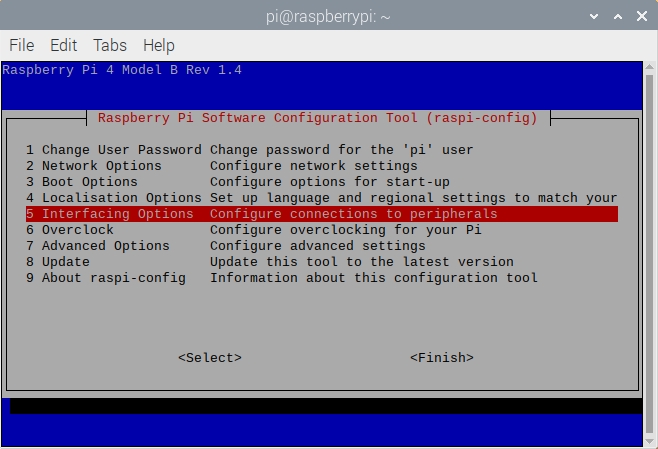
1. Configure Pi serial port access
If you're at the Raspberry Pi desktop, select Accessories > Terminal from the Raspberry menu.
Run
sudo raspi-config.Use the cursor keys to highlight Interfacing Options, then hit Enter:
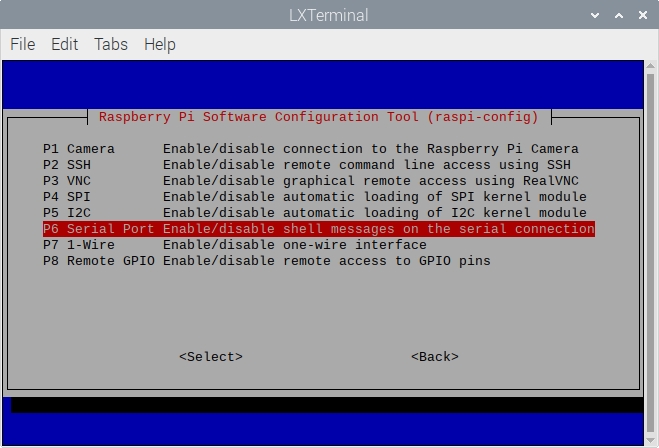
Now highlight Serial Port and hit Enter:
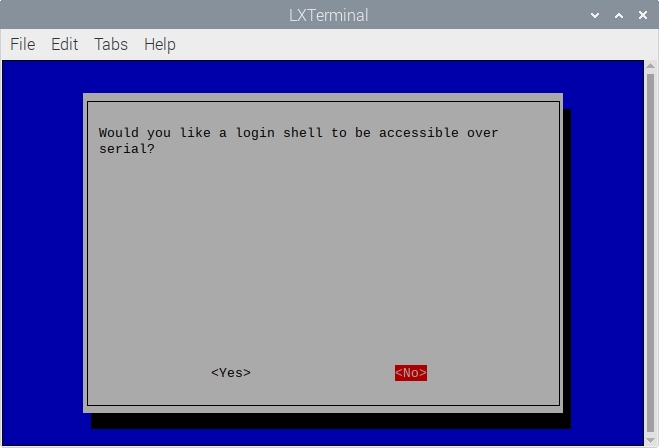
When you are asked Would you like a login shell to be accessible over serial? select No and hit Enter:
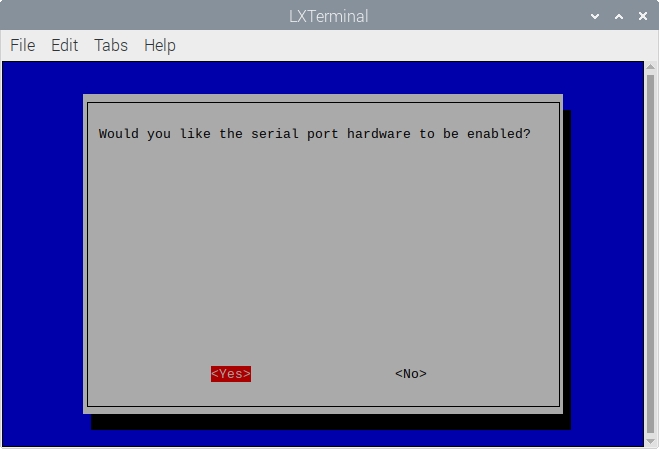
When you are asked Would you like the serial port hardware to be enabled? select Yes and hit Enter:
Select Finish .
The
raspi-configutility will offer to restart the Pi — accept its suggestion.
2. Power up the Hat
When the Pi is back up, you should see that the SIM7600G-H 4G Hat's PWR LED is lit. Now press the PWRKEY button on the board — after a brief moment, the NET LED should light up.
At the command line or in a desktop Terminal run:
You should see a list of items all beginning with ttyUSB and including ttyUSB2, which is the device you'll use in subsequent steps. If you don't see a list of TTYs, first check that the SIM7600G-H 4G Hat's PWR and NET LEDs are lit. Make sure your USB cable is not connected to USB TO UART on the Hat.
3. Attach to a cellular network
The SIM7600G-H 4G Hat can be controlled using AT commands issued through a command-line serial console tool which communicates with the Hat's cellular module. We'll use Minicom here, but if you prefer to use an alternative tool, such as Screen, that's fine. At the command line or in a desktop Terminal run:
Enter minicom -D /dev/ttyUSB2 to open a connection to the modem. If Minicom posts an error indicating that /dev/ttyUSB2 is inaccessible, please check your SIM7600G-H 4G Hat setup.
Just hit Enter after keying in each of the following commands. Wait for the modem to respond before moving on to the next command.
You should see something like +COPS: 0,0,"Vodafone UK Twilio",7 which tells you which network you're connecting through. You should also see the Hat's NET light flashing.
4. Connect to the Internet
Now you know you have a cellular connection, you can connect to the Internet. You need to install the PPP (Point-to-Point Protocol) software the PI will use to establish the connection, and to configure it. First run the following commands at the command line:
The last of these commands opens the primary configuration file in a text editor so you can make the required changes. Make sure the file contains the following lines. Some may be missing, others may be present depending on the version of ppp you've installed:
In the same file, look for lines like these and update them so they match what's shown here:
The last line above is the value you determined earlier.
To initiate an Internet connection, at the command line or in a desktop terminal run:
You'll see a stack of lines displayed at the command line.
Meantime, open a fresh terminal and enter:
When the prompt is back, you're ready to try out the Internet connection:
If you're at the desktop, select Turn off Wireless LAN from the network menu at the top right.
If you're at the command line, run
sudo ifconfig wlan0 down.At the command line or in a desktop terminal, enter
ifconfigand look for theppp0entry — it should have a valid IP address listed underinet:

Open up a browser and navigate to korewireless.com:

Well done! You now have a Raspberry Pi computer that's connected to the Internet via Super SIM. You can now start experimenting with cellular Internet connectivity, or begin developing your own IoT application proof-of-concept.
Next steps
Your Raspberry Pi and Waveshare SIM7600G-H 4G Hat are now able to access the cellular network. Over to you: what are you going to build? We can't wait to find out.
In the meantime, here are some suggestions for things to try:
Write some code to get data from a cloud service API via cellular. Here's a good selection of public APIs .
Use the Console or Super SIM API to monitor your Super SIM's data usage.
Check out our guide Introduction to AT commands and try sending to your modem some of the more useful commands it lists.
Last updated
Was this helpful?